pi-defender
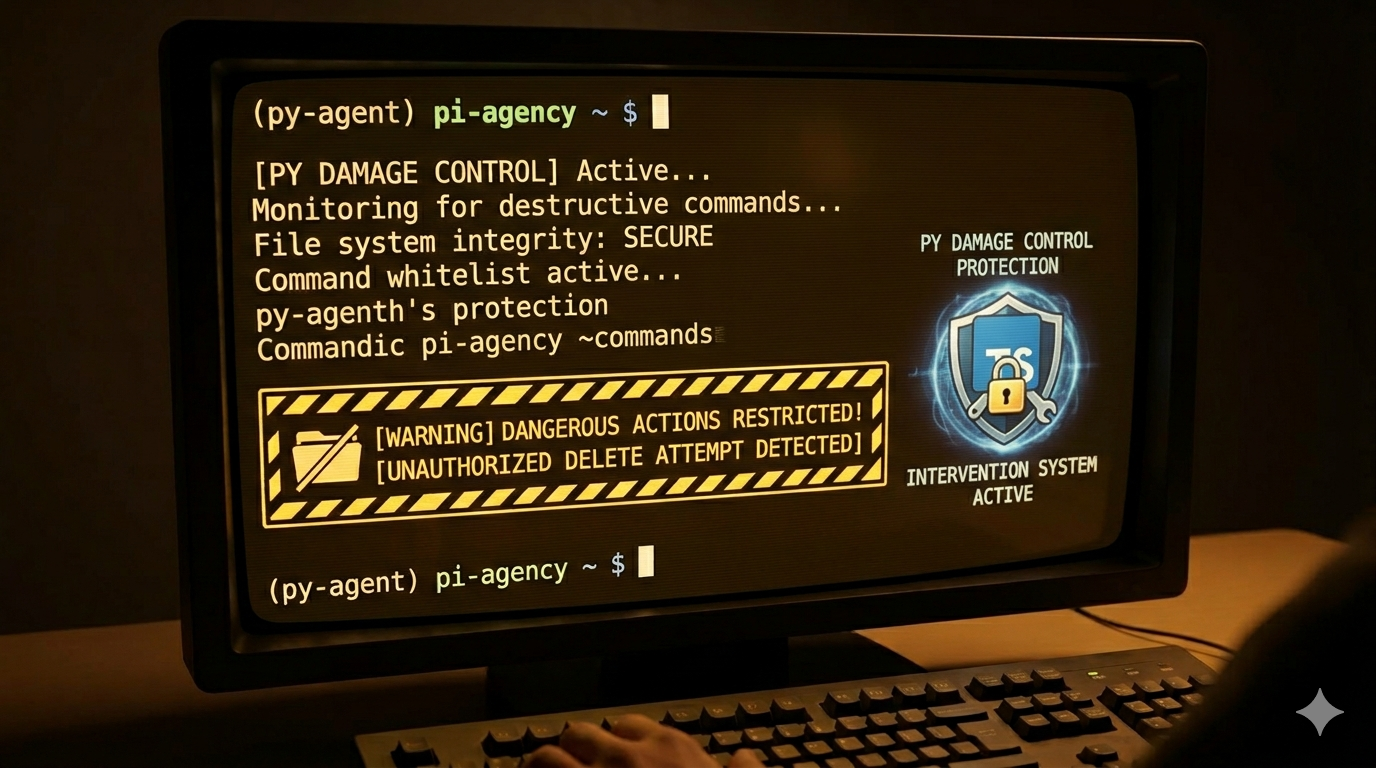
Defense-in-depth protection for Pi coding agent. Blocks dangerous commands and protects sensitive files — rename of pi-damage-control.
Package details
Install pi-defender from npm and Pi will load the resources declared by the package manifest.
$ pi install npm:pi-defender- Package
pi-defender- Version
1.3.1- Published
- May 18, 2026
- Downloads
- 1,537/mo · 1,537/wk
- Author
- serhioromano
- License
- MIT
- Types
- extension
- Size
- 1.6 MB
- Dependencies
- 2 dependencies · 0 peers
Pi manifest JSON
{
  "extensions": [
    "./src/index.ts"
  ],
  "image": "https://raw.githubusercontent.com/Serhioromano/pi-defender/refs/heads/master/images/pi-defender.png"
}
Security note
Pi packages can execute code and influence agent behavior. Review the source before installing third-party packages.
README
Pi Defender 🛡️
[!WARNING] This extension is provided "as is", without warranty of any kind. The author assumes no liability for damages or data loss resulting from its use. Use at your own risk.
For maximum data security, always maintain up-to-date backups of your work.
Defense-in-depth protection for Pi coding agent. Blocks dangerous commands and protects sensitive files — a Pi port of claude-code-damage-control. Previously published as pi-damage-control.
Inspired by disler/claude-code-damage-control!
Features
🔒 Bash Command Protection
Regex patterns to block dangerous commands before execution. Instead of auto-blocking, shows a selector:
- ⚠️ Allow anyway — run the dangerous command despite the warning
- ❌ Deny & Abort — cancels the agent's turn immediately + blocks all bash and file writes until reset
| Category | Examples |
|---|---|
| Destructive file ops | rm -rf, find -delete |
| Privilege escalation | sudo, su - |
| Database destruction | DROP TABLE, DELETE FROM x; (no WHERE) |
| Git force ops | git push --force, git reset --hard |
| Network attacks | curl | bash, wget | sh |
| Disk destruction | dd if=, mkfs.* |
| Docker hazards | docker rm -f, docker system prune |
| Package unpublish | npm unpublish |
| Permission danger | chmod 777, chown -R |
| System shutdown | reboot, shutdown, halt |
🛡️ Path Protection (3 levels)
| Level | Read | Write/Edit | Delete | Use for |
|---|---|---|---|---|
| zeroAccess | ❌ | ❌ | ❌ | Secrets, keys, credentials |
| readOnly | ✅ | ❌ | ❌ | System files, lockfiles |
| noDelete | ✅ | ✅ | ❌ | Important project files |
⚠️ Ask Mode
For destructive-but-valid commands (git push --force, git push --delete, npm unpublish), instead of blocking outright, the extension shows a confirmation dialog. You decide.
🔒 Strict Mode (ON by default)
Block ALL bash tool execution and require explicit user approval for every command. Perfect when you want to review every action the agent takes.
- ON by default — you get protection out of the box. Use
/defender:strict offto disable. - Selector UI: Arrow-key navigable selector with 5 options per command:
- ✅ Approve — run this command once
- ⚠️ Deny (try something else) — block this command, agent can try alternative approach
- ⭐ Approve All Session — auto-approve all future safe commands (patterns.yaml blocked rules still enforced)
- 📋 Allow & Whitelist — remember this command pattern for future sessions
- ❌ Abort (stop all execution) — block this command AND lock all future bash commands until reset
- patterns.yaml always enforced: Commands matching blocked patterns are never allowed, even with approve-all or whitelist
- Number key shortcuts: Press
1-Nto instantly select any option — faster than arrow keys - Whitelist: Save trusted commands to
.pi/patterns.yamlfor persistent auto-approval across sessions - Toggle with
/defender:strict(on|off, or no parameter to toggle) - Shows 🛡️🔒 badge when active
🎯 Protection targets
- Bash tool: command patterns + path references in commands
- Write tool: path check against zeroAccess and readOnly
- Edit tool: path check against zeroAccess and readOnly
- Read tool: path check against zeroAccess
Quick Start
Option 1: Install as Pi package
pi install npm:pi-defender
Option 2: Manual (project-local)
mkdir -p .pi/extensions
curl -o .pi/extensions/defender.ts https://raw.githubusercontent.com/Serhioromano/pi-defender/main/src/index.ts
# Also copy config.ts and place patterns.yaml in .pi/defender/
Option 3: Global
mkdir -p ~/.pi/agent/extensions/pi-defender
cd ~/.pi/agent/extensions/pi-defender
curl -L -O https://raw.githubusercontent.com/Serhioromano/pi-defender/main/package.json
mkdir src
curl -o src/index.ts https://raw.githubusercontent.com/Serhioromano/pi-defender/main/src/index.ts
curl -o src/config.ts https://raw.githubusercontent.com/Serhioromano/pi-defender/main/src/config.ts
npm install
Configuration
Defender loads configuration in this order and merges it:
~/.pi/patterns.yaml     # Global config (auto-deployed on first load)
.pi/patterns.yaml       # Project config (alternate name)
Initialize project config
In your Pi session:
/defender:patterns
This copies the bundled src/patterns.yaml into .pi/defender/patterns.yaml. Edit it to customize.
patterns.yaml structure
bashToolPatterns:
  - pattern: '\brm\s+-[rRf]'        # Block completely
    reason: rm with recursive or force flags

  - pattern: '\bgit\s+push\s+.*--force'  # Ask for confirmation
    reason: git push --force
    ask: true

zeroAccessPaths:
  - ~/.ssh/
  - *.pem
  - .env.production.local

readOnlyPaths:
  - /etc/
  - *.lock
  - ~/.bashrc

noDeletePaths:
  - .pi/
  - LICENSE
  - README.md

strictModeWhiteList:
  - npm\\ test
  - git\\ status
  - ls\\ -la
Path pattern support:
- Literal paths:
~/.ssh/,/etc/,.pi/— prefix matching - Glob patterns:
*.pem,*.lock,*-credentials.json— fnmatch against basename and full path
Reload config
/defender:reload
Check status
/defender:status
Shows: blocked/allowed/asked counts and active config summary.
Strict Mode
Strict mode adds an extra layer of protection — every bash command must be explicitly approved.
ON by default
Strict mode is active from the first session. You'll see:
🛡️ Defender vX.Y.Z active 🔒 Strict Mode ON (30 patterns, 18 zero-access, 24 read-only)
Deactivate
/defender:strict off
Re-activate
If you turned it off, re-enable with:
/defender:strict on
You'll see: 🛡️🔒 Strict Mode ACTIVATED (default) — ALL bash commands now require your approval
Workflow
When the agent tries to run a bash command, a selector appears with the command clearly displayed. Chained commands (using &&, ||, ;) are split and each sub-command is approved individually — you see exactly which command you're approving.
Single command:
────────────────────────────────────────────────
 🛡️🔒 Strict Mode — Bash Command

  Run  /defender:strict off  to turn Strict Mode off and stop these prompts

 Command:
  ls -la /some/path

 ▶ ✅ Approve this command
   📋 Allow & Whitelist (remember for future)
   ⭐ Approve ALL session (skip future prompts for safe commands)
   ⚠️ Deny (try something else)
   ❌ Abort (stop all execution)

 ↑↓ navigate · 1-N select · enter confirm · esc deny
────────────────────────────────────────────────
Press 1-5 to select an option instantly — much faster than arrow keys.
Chained command (e.g. git add . && git commit -m "msg") — two separate selectors appear, one per sub-command. First for git add .:
 🛡️🔒 Strict Mode — Bash Command (1/2)

 Command:
  git add .

 ▶ ✅ Approve this command
   ...
 ──────────────────────────────────────────────
Then for git commit -m "fix: resolve path issue":
 🛡️🔒 Strict Mode — Bash Command (2/2)

 Command:
  git commit -m "fix: resolve path issue"

 ▶ ✅ Approve this command
   ...
 ──────────────────────────────────────────────
Each selector shows only the sub-command being approved — with an accent-colored Command: label and a step indicator like (1/2). If you deny or abort any sub-command, the entire chain is blocked.
Approve All Session
Selecting ⭐ Approve All Session auto-approves future bash commands that are not blocked by patterns.yaml. Blocked patterns (like rm -rf, sudo, etc.) are always enforced.
Abort
Selecting ❌ Abort (stop all execution) blocks the current command AND locks down all future bash commands. The agent cannot execute any more bash commands until you reset with:
/defender:strict off
This is useful when the agent is going in a wrong direction and you want to stop it completely.
Whitelist
When strict mode prompts you for a command you trust (like npm test or git status), select 📋 Allow & Whitelist to save a regex pattern for it. Future runs of the same command are auto-approved — no prompt needed.
- Pattern is saved to
.pi/patterns.yamlunderstrictModeWhiteList - The file is created automatically if it doesn't exist
- Duplicate patterns are detected and not re-added
- When a whitelisted command runs, a notification shows which pattern matched
- Patterns are JS regex — you can manually edit
.pi/patterns.yamlto refine them
Deactivate
/defender:strict off
You'll see: 🛡️ Strict Mode DEACTIVATED — normal protection restored (patterns.yaml rules only). Use /defender:strict on to re-enable.
Or toggle without a parameter:
/defender:strict
Status
/defender:status shows strict mode state and per-mode statistics:
🛡️ Defender Stats
  Allowed: 42 | Blocked: 3 | Asked: 2
  Strict mode: 🔒 ACTIVE (default) (approve-all session)
  Strict: 15 approved | 2 blocked | 1 approve-all
  ...
What Gets Blocked / Prompted
Bash commands matching patterns.yaml:
- Instead of auto-blocking, shows a selector: ⚠️ Allow anyway / ❌ Deny & Abort
- Deny cancels the agent's turn via
ctx.abort()— the agent cannot try alternative approaches - All future bash + file writes/edits blocked until
/defender:strict off - Patterns checked:
bashToolPatternsregex matches,zeroAccessPathsreferences,readOnlyPaths/noDeletePathsoperations
Bash commands referencing paths:
Edit/Write blocked:
- Any path matching
zeroAccessPaths - Any path matching
readOnlyPaths
Read blocked:
- Any path matching
zeroAccessPaths
Commands
| Command | Description |
|---|---|
/defender:status |
Show statistics, strict mode status, and active config |
/defender:reload |
Reload YAML configuration |
/defender:patterns |
Initialize project-local patterns.yaml |
| `/defender:strict [on | off]` |
Directory Structure
pi-defender/
├── package.json           # npm package + pi extension manifest
├── src/
│   ├── index.ts           # Extension entry point
│   ├── config.ts          # Config loading, pattern matching, path checking
│   └── patterns.yaml      # Single source of truth — bundled defaults
├── README.md
├── CHANGELOG.md
└── LICENSE
Installed locations:
~/.pi/defender/patterns.yaml     # Global config
.pi/defender/patterns.yaml       # Project config
How It Works
Pi extensions subscribe to the tool_call event, which fires before any tool execution. The extension:
- Bash tool: Parses the command string, checks against regex patterns and path references
- Write/Edit tools: Extracts the file path, checks against zeroAccess/readOnly lists
- Read tool: Extracts the file path, checks against zeroAccess list
Blocked tools return { block: true, reason: "..." } which Pi displays to the user.
Ask-mode patterns show a confirmation dialog via ctx.ui.confirm().
Testing
After installing, try these prompts in Pi:
> Run: rm -rf /tmp/test
Should block (rm with force flag).
> Run: git push --force origin main
Should prompt for confirmation.
> Write a file to /etc/hosts
Should block (system path).
> Read ~/.ssh/id_rsa
Should block (zero-access).
Development
# Clone
gh repo clone Serhioromano/pi-defender
cd pi-defender

# Install deps
npm install

# Test with Pi
pi -e src/index.ts
License
MIT — see LICENSE
Credits
Previously published as pi-damage-control. Inspired by and ported from claude-code-damage-control by disler. Adapted for Pi's native TypeScript extension API.